Setting up HTTPS for free in 15 minutes
I have already mentioned Let's Encrypt in a previous post, but to illustrate that I really wasn't joking, and also because yesterday I had an opportunity to set it up on another server, I want to demonstrate how painfully easy it is.
I did this whole setup on Debian and Ubuntu servers, using nginx as the HTTP daemon. I'll assume you already have nginx installed, but for demonstration purposes I'll use a simple static web root in this post, which you can easily replace with whatever nginx setup you need. Git is also assumed to be installed on the machine to download the Let's Encrypt client.
Without further ado, let's begin:
# time bash
We'll start by creating a server definition for nginx, which will redirect to the HTTPS version of the site, unless it finds a corresponding file in a predefined directory, in which case it will serve that file.
The reason for this is that Let's Encrypt performs validation using a protocol called ACME, which asks the client to make a file with a certain name available on the domain for which it requests a certificate, over HTTP.
The official client has support for Apache, and some experimental code for nginx as well, which would take care of setting up all configuration files without manual intervention, but I don't trust that kind of magic by default, and the webroot-based approach works well enough for me.
So, let's create the config and everything:
# cat > /etc/nginx/sites-available/letest.koniiiik.org <<EOF
server {
    listen 80;
    server_name letest.koniiiik.org;
    location / {
        try_files \$uri @ssl_redirect;
        root /var/www/acme;
    }
    location @ssl_redirect {
        return 301 https://letest.koniiiik.org\$request_uri;
    }
}
EOF
# ln -s /etc/nginx/sites-{available,enabled}/letest.koniiiik.org
# mkdir -p /var/www/acme
Let's check that the configuration is correct, and reload nginx:
# nginx -t
nginx: the configuration file /etc/nginx/nginx.conf syntax is ok
nginx: configuration file /etc/nginx/nginx.conf test is successful
# systemctl reload nginx.service
Now, let's clone the letsencrypt repository from Github, which contains the client:
# git clone https://github.com/letsencrypt/letsencrypt
The easiest way of running the client is using the letsencrypt-auto script provided with the repository. That will automatically install all system dependencies using apt-get (or whatever package manager is the default on your system), create a Python virtualenv in ~/.local/share/letsencrypt, and execute the newly-installed Python script. If you're not comfortable with this magic, the docs outline a number of other options.
Anyway, using letsencrypt-auto, the entire process of getting a certificate looks like this:
# ./letsencrypt-auto certonly --webroot --email koniiiik@letest.koniiiik.org \
                     -w /var/www/acme/ -d letest.koniiiik.org
This will take a while, especially the first time you run letsencrypt-auto, since it needs to install several dozen Python packages, not to mention the stuff it needs to download from your system repositories. Then, you'll need to accept the terms of service, at which point you're less than a minute away from a working certificate.
At last, you'll receive some information about where to find your new certificate, private key, and a few bits of useful information. You'll find everything important in /etc/letsencrypt/live/your.domain.tld/. This directory will always contain symlinks to the latest versions of your certificate chains, and your private key.
Finally, all you need to do is set up an HTTPS server block in your nginx configuration, and you're pretty much done:
# cat >> /etc/nginx/sites-available/letest.koniiiik.org <<EOF
server {
    listen 443 ssl;
    server_name letest.koniiiik.org;
    ssl_certificate /etc/letsencrypt/live/letest.koniiiik.org/fullchain.pem;
    ssl_certificate_key /etc/letsencrypt/live/letest.koniiiik.org/privkey.pem;
    root /var/www/letest.koniiiik.org;
    index index.html;
    location / {
        try_files \$uri =404;
    }
}
EOF
Let's also create some sample content for the new website, just to try it out, and reload the server:
# mkdir -p /var/www/letest.koniiiik.org
# cat > /var/www/letest.koniiiik.org <<EOF
<!DOCTYPE html>
<html>
<head>
<title>Welcome to your new Let's Encrypt-certified site!</title>
<style>
body {
width: 35em;
margin: 0 auto;
font-family: Tahoma, Verdana, Arial, sans-serif;
}
</style>
</head>
<body>
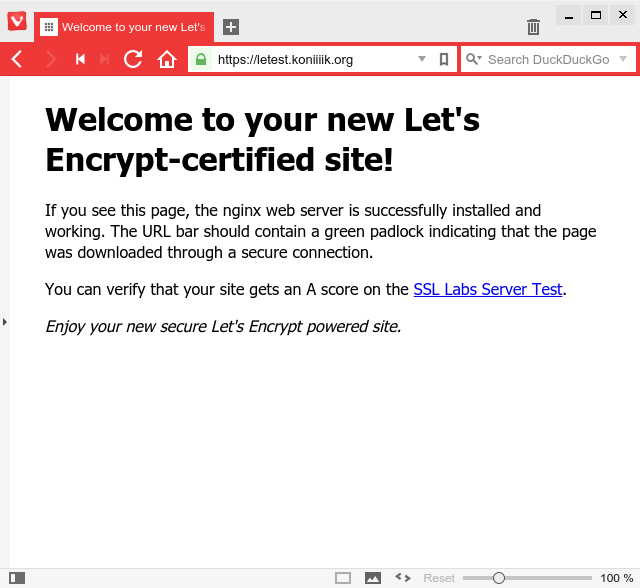
<h1>Welcome to your new Let's Encrypt-certified site!</h1>
<p>
If you see this page, the nginx web server is successfully installed
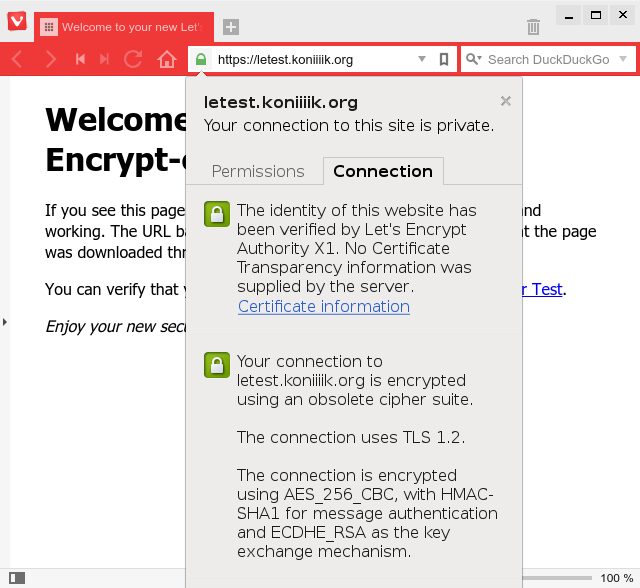
and working. The URL bar should contain a green padlock indicating
that the page was downloaded through a secure connection.
</p>
<p>
You can verify that your site gets an A score on the
<a href="https://www.ssllabs.com/ssltest">SSL Labs Server Test</a>.
</p>
<p>
<em>Enjoy your new secure Let's Encrypt powered site.</em>
</p>
</body>
</html>
EOF
# nginx -t
nginx: the configuration file /etc/nginx/nginx.conf syntax is ok
nginx: configuration file /etc/nginx/nginx.conf test is successful
# systemctl reload nginx.service
Visit your new site, and ta-da!
Let's look at the time:
# exit

real    17m54.328s
user    1m39.068s
sys     0m13.360s
Damn, that's three minutes more than I promised. In my defense, I made an embarrassing number of typos while typing out those configuration snippets by hand, which took me more than five minutes to sort out. Does that count as an excuse?
Now you have a working HTTPS setup with a trusted certificate, but in order to get a high score on the SSL test, there are a couple more settings you'll probably have to tune in your nginx configuration.
First, create a custom set of Diffie-Hellman parameters:
# openssl dhparam -out /etc/ssl/dhparam.pem 2048
This command will run for a while (read: maybe several minutes); don't worry if it seems to take long. If you're paranoid, you can bump it up to 4096, but there's no real need for that yet, and that one might run for as long as an hour, depending on your hardware.
Then, add the following set of configuration directives to the http section of your nginx.conf:
##
# SSL Settings
##

ssl_protocols TLSv1 TLSv1.1 TLSv1.2; # Dropping SSLv3, ref: POODLE
ssl_prefer_server_ciphers on;
ssl_session_timeout 5m;
ssl_session_cache shared:SSL:10m;
ssl_dhparam /etc/ssl/dhparams.pem;
ssl_stapling on;
ssl_stapling_verify on;
# Replace with your actual DNS resolver.
resolver 1.2.3.4;
This sets up a bunch of extra TLS features like OCSP stapling (for more efficient revocation checks), a shared session cache, those Diffie-Hellman parameters, and disables SSLv3, which is considered insecure.
Give nginx another reload, and then you can give it a spin on the SSL Test.
Of course, there are a bunch more parameters you can tune to max those green bars out, but that stuff is way beyond the scope of this post. The Mozilla wiki contains a wealth of information on this topic, for example.
So, that would be it for the HTTPS server setup.
You know what's even better? You can use the same certificate even for services other than HTTPS – SMTP, IMAP, IRC, ... You name it.
There's one more topic worth mentioning: renewals. Certificates issued by Let's Encrypt are valid for 90 days, and the recommended period of renewal is two months. The plan is to make it possible to just set up a cronjob that would run every two months, fetch a new certificate, reload all affected services, and just generally be awesome. This is not officially supported yet by the official client, but it is on the roadmap.
If you look up at the setup of the plain-text HTTP server block, with this setup I expect renewals to be simple. (I haven't tried it yet, but spoon.) Even without official support for nginx configuration in the client, with this setup, just running the client in webroot mode (which we used to get the initial certificate) should be just fine, and it shouldn't affect the website itself. In case you don't trust the client to clean up after itself in its ACME webroot, you can simply set up your renewal scripts to wipe the directory after it finishes.
Anyway. That wasn't too hard now, was it? Shouldn't take longer than reading this article. Now then, are you still running a plain-text HTTP server? What's your excuse?
Comments
Comments powered by Disqus